Saturday, 21 April 2018

Blended learning / Flipped classroom

In this post I show you how I teach the course Digital Signal Processing at the University of Glasgow.

It's flipped classroom style where the students learn by doing extensive lab experiments and watch videos in their own time.

The video clips are a combination of:
 This photo shows my setup to record the videos:

All this combined with a lot of labs where the students have to solve real world problems by coding in Python (object oriented) and C++. In the past we had:
  • Filtering of audio to make it sound better by faking an SM58 response
  • Reverse engineering the (in-)famous aural exciter
  • Doing OFDM via an audio link (=ADSL)
  • Filtering ECG with FIR and IIR filters
  • Writing a heartrate detector
  • Removing noise from audio recordings
  • Writing Python / SWIG wrappers for efficient FIR/IIR filters 
There were no traditional lectures but we had three tutorials prepping them for the written exam.

Storytelling 

Prep

Planning is key as in any other filming task. The better planned the less takes are necessary.
Prior to recording I prepare every clip either as a handwritten note which I keep on the side or as a text-document outside of the capturing area - in my case on the right screen. The same applies to programming commands which I keep pre-prepared on the screen off the capturing area. Clips can be from 3mins to 30mins but ideally should stay short in the region of 3-5mins. However, some mathematical derivations cannot be split up easily and turn out to be longer. Students will pick and choose usually anyway. They might first watch the beginning and then the end. Later then they will be watching the whole derivation.

Playlists

Generally, I arrange clips into playlists for YouTube. A playlist then covers a topic, for example FIR filter design. Playlists could be seen as the actual lectures in terms of classical lectures however they are really covering topics here. Every playlist then contains a sequence of clips roughly covering these different subtopics:
  • motivation
  • theory
  • example illustrating the theory
  • simulation, and finally a 
  • proper practical example pointing to the real world. 

Feedback

It's easy to make a mistake which goes unnoticed. In my case my colleague in Singapore (thanks, David!) did the checking and spotted quite a lot of mistakes.However, even mistakes on the final clips are not a disaster: YouTube is a social medium. People can comment underneath and you can also add a correction underneath the clip and let students come up with ideas how to make it better.

Technology 

Central technique for the video recordings

Capture a region of the screen which is 1280x720 pixels wide (HD resolution) and then show within that region whatever needs to be presented.

This content could be a programming environment in Python (Spyder) or the view on a sheet of paper or both combined! The next sections show how to bring this all together.

Video camera


As a video camera I use the Epson visualiser ELPDC06 or the ELPDC07. It acts as a standard webcam so that I only need is a simple webcam viewer. Under Windows 10 this is called CAMERA and is a standard Microsoft app.
I use the full resolution of the camera and would recommend it to avoid aliasing.
In terms of lighting: I didn't use the built in light of the visualiser because it was too uneven. Just the room-light from my office fluorescent lights was perfect for this pupose. Generally very diffuse light works best (i.e. office ceiling lights).

Clipboard

It is very beneficial to use a clipboard to have the sheets of paper at the same place during the recording. This allows later to edit out sequences and also to patch up mistakes in the edit because the drawings won't move. Note that the area around the sheets is also white to force the automatic exposure of the camera to expose as dark as possible.

Pen

A pen with slightly wider strokes than a ballpoint is beneficial. I use this pen by Maped:

It's a fountain pen and takes standard black ink cartridges. However instead of a steel tip it has a ballpoint. This won't create nice calligraphic lines but it won't smude and produces perfect black lines.

See the difference in my video clips: standard ballpoint pen and fountain pen.


Video capture

The central idea is that the capture area on the screen is the video mixer. The only software I need is some simple screen capture software.

I used Snagit (part of Camtasia) in the past but now it's 

ZOOM!

  1. Start zoom
  2. Go into settings and select under Video: "optimise video for 3rd party software".
  3. New meeting
  4. Join with computer audio
  5. Now you have a meeting with yourself! :)
  6. Click on "Share" on capture your screen (ideally you have two screens)
  7. Press "record" on this computer (do not "cloud" that will take hours to save)
  8. Now do your presentation.
  9. Use the "Annotate Function" to draw the viewer to what you are doing.
  10. End meeting

Audio

Soundcard

With normal soundcards the problem is that you won't be able to hear yourself through the headphone. However this is very important because time is precious and you want to know instantly if the sound/content is OK or not. Take for example breathing. The microphone might catch the air puffs from your breathing and the recording might be unusable. A second issue is microphone positioning because all headsets mentioned here have highly directional microphones. Moving the microphone just a bit up or down will impact on the quality of the sound.

For webcasts the TASCAM US-125M or the US-2x2 are just great. They allow capturing audio from different sources such as a microphone (XLR/jack) and feed the mixed sound directly back to the headphone.The US-125M is now being superseded by the US-2x2 which has also phantom power so that also professional condenser Mics can be used.

Headset

I went for the BPHS1 from audio technica:
It has a dynamical microphone which sounds really good compared to standard Skype headsets and has a proper balanced XLR plug for the dynamic microphone. With the cheaper Skype headsets I had trouble with interference but this headset produces clean sound no matter how noisy the power is at work.


Editing


For editing I use Sony Vegas because it allows batch processing so that it's possible to prepare many clips on the timeline and then Vegas renders them out as separate files, nicely numbered. This means after a long day of editing I just start it, go to bed and next morning I have all clips nicely rendered and ready to be uploaded in one go. See my previous post about batch processing and the script I'm using for this. The screen shot above shows the whole playlist (i.e. lecture) which means that all clips are in this single timeline. The region markers define the start/endpoints for every clip and then the batch render generates separate video files which all together then form a playlist. All this can run over night and then uploaded with one drag/drop to YouTube next morning. It saves enormous time.
You need to have the Vegas pro version to be able to do batch render. Apart from the very convenient batch render virtually any video editor is suitable. At the end you need a program which is able to trim the start, end, can remove sections in the middle of a take, can normalise audio and video.

Note: This is an updated post of a previous blogpost which I wrote a couple of years ago.

Tuesday, 2 August 2016

Sony Vegas 13 under Windows 10

After I've upgraded to Windows 10 Sony Vegas would get stuck at "Initialising ActiveX plug-ins". I wasn't even able to kill the process with the task manager.

The solution is the following (some steps might be redundant):
  1. Uninstall Vegas 13
  2. Remove any entries called "Vegas" from the registry with regedit (be careful!)
  3. Re-install Vegas 13 and register it
  4. Right click on its icon and modify Target: "C:\Program Files\Sony\Vegas Pro 13.0\vegas130.exe" /NODXGROVEL
  5. Go to the device manager and disable your graphics card.
  6. Reboot your computer so it boots into plain VGA mode
  7. Right click on the Vegas icon and select "Run this program as Windows 7"
  8. Start Vegas
  9. Go into settings an disable GPU support in both the general settings and for the 2nd monitor
  10. Option: If you are adventerous try to re-enable GPU support! ;)
That took me a week to figure it out. Hope that helps others!

Saturday, 13 June 2015

Creating a DCP from a Premiere Pro CC project with OpenDCP

 Here I'm describing how to create a DCP master for digital cinema projection. This here describes how to directly export from a Premiere Project using the media encoder.

Sound levels

Digital cinema projection requires average sound levels at -24dB. These are subjective levels and not peak levels which can go up to -1dB. Premiere has an amazing tool which is called "Loudness Radar" which shows you the loudness of your film. Just add it to your master bus and press edit.
Generally cinemas expect 5.1 sound: left, right, center, left surround, right surround and low frequency effects. Make sure that all your sequences are 5.1 sequences and not just stereo. As a rough guide dialogue is on the center speaker and the music on  L/R. So the most basic setup is one center speaker and L/R. A subwoofer (LFE) channel is also strongly recommended especially for the music when the L/R speakers are not full range.

Video levels

I assume here that you grade your film in Premiere with a calibrated monitor. I've got the Pantone Huey for the monitor calibration (two Philips 2215 OLED screens). Video levels should of course stay between 0% and 100% where I rarely go over 90%. I'm editing under Windows which gives me a gamma of 2.2 which seems to be pretty accurately mapped after calibration. That's important to understand why we need to use (sRGB complex) later on in OpenDCP (version 0.30).

Export with the media encoder


Video
 
The video is exported as a sequence of TIFF images. For a feature film at 2K that is about 1TB of hard drive space.
  • Frame rate: Make sure that the TIFF export is at the frame rate your project is. For example here the film was shot at a frame rate of 23.976FPS so the TIFF export should have the same frame rate.
  • The resolution is 1998x1080. If you shot in HD then Premiere will add transparent bars left and right to pad it up to 1998 pixels. OpenDCP will ignore the alpha channel and luckily the underlying transparent pixels are actually black so that the left / right bars cause no problems.
  • Bits per colour is 16bits.
  • Tick the box "Use Maximum Render Quality"
  • Make sure that you have no transparent sections in the film. For example, the titler will use a transparent background by default, for example. However openDCP ignores the alpha channel which leads to messed up titles. Make sure that the titles have a black background.The same applies to fade to blacks via transparency (which you shouldn't do anyway).
  • After export check with GIMP that the correct levels have been exported. 0=black.
  • Take a note of the number of TIFF images we have exported. A feature film will have about 130,000 frames. This will be used for the audio conversion.
Audio


The sound files are exported as WAV files. Here, you need to create your own template probably. Cruical is that you export the audio streams separately: 48kHz, 24bits and mono. After export you get files like "myfilm_1.wav", "myfilm_2.wav" etc. Here is the mapping:
1=L
2=R
3=C
4=LFE
5=Ls
6=Rs

If you have any other framerate than 24fps you need to change the speed of the audio. In our case the film was shot at 23.976fps but will play at 24fps. So we need to speed up the film by 0.1%. However a better approach is to calculate the total number of samples of your film from the number of frames we have. Since we have exported a numbered TIFF sequence we know how many frames we have. On a DCP the frame rate is 24fps and the audio sample rate is 48kHz which means we need to have exactly 2000 samples / frame. So the total number of samples needs to be = number of frames * 2000. Adobe Audition is perfect for this purpose because you can set it to display everything in audio samples.

Use the effect Stretch and Pitch. The algorithm "Audition" is the one to choose and then just "Stretch". If you convert from 23.976 to 24fps this means that the film will play 0.1% faster so the stretch is 99.9%. Audition might change the duration from a multiple of 2000 to something slightly longer. In this case it decided to add to the film 9 audio samples which is of course not audible.At the end you should have 6 audio files normalised to a frame rate of 24fps.


Creating a DCP compatible drive

Hardware

The DCP is shipped on a 500GB hard drive which is inside of a CRU DataPort DX115 or DX115DC. You can also use a USB3.0 drive. The right part shows the actual DX115 carrier which contains the hard drive. I used a pretty standard 500GB hard drive. As long as it's SATA it should be fine. The docking station is an adapter which allows a SATA connection and perhaps a USB connection. Connect a SATA cable to one of the free SATA slots inside of you your computer and run it to the docking station.
Alternatively buy an internal docking station which fits into a standard DVD drive slot. This is actually the "proper" method because this internal docking station is used in the DCP servers and allows hot swapping. It is very elegant in that you can plug in the drive while the server is running and Linux can mount it automatically. Removal of the drive can also happen during operation.
USB 3.0 seems to be now catching on but I haven't tested it with a USB drive.

Linux

Time to reboot to Ubuntu Linux or in my case I have a separate Linux computer which talks to the windows box via a samba share.

Formatting the drive

The drive needs to be formatted as EXT3. This is probably the most risky step because you need to format the external drive and not your operating system (!). Type dmesg and have a look which drive is associated with your external drive:
[  139.684652] sd 7:0:0:0: [sdd] 976773168 512-byte logical blocks: (500 GB/465 GiB)
[  139.684689] sd 7:0:0:0: Attached scsi generic sg4 type 0
[  139.684712] sd 7:0:0:0: [sdd] Write Protect is off
[  139.684716] sd 7:0:0:0: [sdd] Mode Sense: 00 3a 00 00
[  139.684746] sd 7:0:0:0: [sdd] Write cache: disabled, read cache: enabled, doesn't support DPO or FUA
[  139.705147]  sdd: sdd1
[  139.705360] sd 7:0:0:0: [sdd] Attached SCSI disk
[  273.000188]  sdd: sdd1
[  429.766469]  sdd: sdd1
In this case plugging in the external drive gives you the device /dev/sdd. To be safe you should use fdisk with "fdisk /dev/sdd" and delete all particions and then create one primary Linux partition. It's menu guided so not very difficult.
Then you need to format this partition with:
sudo mkfs.ext2 -I 128 -j /dev/sdd1
This creates an EXT3 file system with an inode size of 128 bytes. Some people had difficulties with inode size of 256 on older servers but that was in 2008. Modern servers should all support the now default inode size of 256 but to be safe just force the formatter to use an inode size of 128. The option "-j" creates an EXT3 filesystem. However, also an EXT2 should do because it's downward compatible. Again, better to create an EXT3 even if that's not required by the DCP standard and a journal pretty useless in a read only filesystem.
Mount the newly created drive with:
sudo mount /dev/sdd1 /mnt
and then change permissions that you can write to it as a normal user:
sudo chmod a+rwx /mnt

Using openDCP

What I'm describing here has been done under both Ubuntu and Windows with OpenDCP (https://www.opendcp.org/). Download the ununtu package and install it with "sudo dpkg -i myopendcppackage.deb". Then you are ready to go. If dpkg moans about missing packages just start your favourite package manager and install the missing packages and re-run dpkg. For Windows there is a standard installer. I've done the JPEG2000 conversion under Windows by writing it on the samba share and then done the rest under Linux.

Creating the JPEG2000 files

The TIFFs need to be converted to JPEG2000 files and into the XYZ colour space. This can be done by the command line tools or by the openDCP gui. I used the GUI for it which shown here.
I just left the settings as they are. Important here is that the framerate is 24P and that the source colour space is 'sRGB complex'and that there is a conversion to the XYZ colour space. It's important to use 'sRGB complex' in version 0.30.0 because 'sRGB' will give you crushed blacks. 'sRGB complex' is actually the correct conversion between sRGB and XYZ whereas 'sRGB' in the settings is a hack to fix problems when using Aftereffects for the export.
BTW, don't panic: the preview stays black. Check at the end that all images have been converted. If there are any problems then use the command line tool instead but in my case everything went fine. If you load the JPEG2000 images into GIMp you will notice that they will look hazy and with the wrong contrast. This is normal.

Creating the MXF files

The actual files which are played on the DCP server are MXF files. There is one for audio and one for video. Again, I used the graphical tools to create the MXF files.

Picture

The MXF containing the picture is created again with the "opendcp" GUI. Select "MXF" and then JPEG2000, SMPTE and 24 frames per second. Specify the directory where all the JPEG2000 files reside and the output directory which should be on the EXT3 formatted external drive.
Both, the scanning of the directory and also the conversion will take a while so be patient. Alternatively you could use the command line tool:
opendcp_mxf -i . -o /mnt/myfilm_video.mxf
assuming that the input images are in the current directory and the output MXF goes straight onto the external drive.

Sound


The sound is done in the same way but by selecting WAV in the uppermost drop down box. Select 5.1 surround sound (6 channels). The output MXF should be saved on the EXT3 formatted drive.
Just select all the separate wav files and then press Create MXF. This will probably just take a few minutes. As a curiosity there is no documentation how to create the sound MXF from the command line. You need to use the GUI.

Creating the XML files

The final step is to create the XML files which are the "glue" between the MXF files and contain the title and descriptions such as issuer and rating.
For the final step I switched to the command line tool because in the GUI version it's not clear what's happening to the actual files. The command line version won't move/delete any of the MXF files but just creates the XML files in the same directory. Run it in the directory of the external drive. In my case just called "/mnt" after "cd /mnt" (one line):

opendcp_xml --reel ./a_mugs_game_video.mxf ./a_mugs_game_sound.mxf --title V_MUGS_GAME_SHR-2D-24_F_51-EN_2K_20191105_SMPTE --annotation OpenDCP_CPL --issuer BratwurstAndHaggis --kind feature

Note the string in --title: this has been generated by the openDCP gui. Just click on "Title Generator" which is a standard defined by the DCI.

Don't forget to properly un-mount the drive before unplugging or just shut down the computer. 

To test your DCP plug the HD back in. If you have a USB connection then you should instantly see the files. If you have the internal SATA bay then it should show up in your dmesg when the drive is inserted into the computer. Mount it as described above and check that everything is there.

To test if it plays you can use the NeoDCP. It plays the first 15 secs of your film or you could invest about £100 for a license which is worth every penny. This is only available under Windows and you need to install a driver which can mount the EXT3 filesystem.

Finished!

Credits:
Matt Cameron's DCP tutorial
A big thanks to the GFT for letting me to try out the DCP and especially Barney who gave me valuable feedback especially about the sound.

Saturday, 6 June 2015

Premiere 5.1 channel assignments

If you export 5.1 from Premiere as separate WAVs then Premiere annoyingly not calls them L,R,C but just 1.wav, 2.wav, etc.

Here is the mapping:

1=L
2=R
3=C
4=LFE
5=Ls
6=Rs

Thursday, 19 December 2013

Producing video lectures

In this post I show you how I recorded the video lecture Digital Signal Processing, a course at the University of Glasgow, taught both in Glasgow and Singapore.

The teaching style comprises:
 This photo shows my final setup (I started with a less elaborated one):

Central idea

Capture a region of the screen which is 1280x720 pixels wide (HD resolution) and then show within that region whatever needs to be presented. 

Storytelling

Generally, I recorded clips and then arranged them into playlists for YouTube. A playlist then covers a topic, for example FIR filter design. Playlists could be seen as the actual lectures in terms of classical lectures however they are really covering topics here. Every playlist then contains a sequence of clips roughly covering these different subtopics:
  • motivation
  • theory
  • example illustrating the theory
  • simulation, and finally a 
  • proper practical example pointing to the real world.
Prior to recording I prepare every clip either as a handwritten note which I keep on the side or as a text-document outside of the capturing area - in my case on the left screen. The same applies to programming commands which I keep pre-prepared on the screen off the capturing area. Clips can be from 3mins to 30mins but ideally should stay short in the region of 3-5mins. However, some mathematical derivations cannot be split up easily and turn out to be longer. Students will pick and choose usually anyway. They might first watch the beginning and then the end. Later then they will be watching the whole derivation.
Planning is key as in any other filming task. The better planned the less takes are necessary. 
Also getting feedback about the clips is essential. It's easy to make a mistake which goes unnoticed. In my case my colleague in Singapore (thanks, David!) did the checking and spotted quite a lot of mistakes.

Within a clip I introduce the subject with a handwritten outline. Then for the main content I use as a main framework again handwritten text on numerous sheets as I would do it in a lecture theatre. Usually my talking closely matches what I'm writing being aware that for many students English is not their first language and I provide this redundancy so that it's easier for them to follow (the native speakers often find this a bit boring but they just skip these bits). Then I pull in different other windows in the capture area such as programming environments, applications, oscilloscopes, web pages, text editors, photos etc. Even films or other YouTube clips would be possible but I haven't used them yet.
At the end of a clip I summarise what I've lectured. This follows the standard storytelling.
In terms of takes I tend to stop as soon as I notice a major mistake and then resume a bit earlier, usually from the top of the page and re-draw everything from that page. This makes editing easiest.

Technoloy

Video camera


As a video camera I use the Epson visualiser ELPDC06. It acts as a standard webcam so that I only need is a simple webcam viewer. 
Under Windows a popular webcam viewer is actually called exactly like that. Under XP there is no need to download any webcam viewer because it is part of the operating system. Under Linux I use camorama which is part of the Ubuntu distribution and can be selected in the package/software manager. I use the full resolution of the camera and would recommend it to avoid aliasing.
In terms of lighting: I didn't use the built in light of the visualiser because it was too uneven. Just the room-light from my office fluorescent lights was perfect for this pupose. Generally very diffuse light works best (i.e. office ceiling lights).

Clipboard

It is very beneficial to use a clipboard to have the sheets of paper at the same place during the recording. This allows later to edit out sequences and also to patch up mistakes in the edit because the drawings won't move. Note that the area around the sheets is also white to force the automatic exposure of the camera to expose as dark as possible.

Pen

It took me a while to get the perfect pen but then my partner took me to a proper stationary store where I finally found the perfect solution. It's this pen here by Maped:

It's a fountain pen and takes standard black ink cartridges. However instead of a steel tip it has a ballpoint. This won't create nice calligraphic lines (sorry John!) as a proper fountain pen does but it won't smude and produces perfect black lines.

See the difference in my video clips: standard ballpoint pen and fountain pen.


Video capture

I had a pretty rough ride finding a working setup for video capture. Usually, people would use camtasia and I had a go at it because it offers capturing from two video sources: the camera for my drawings and my screen. The first problem was that camtasia cannot show the external video camera properly while capturing so that it is impossible to know if the recording is really sharp or if the writing is legible but I thought I could manage. However, after a week of testing I gave up with Camtasia, mainly because it is very unstable and crashes on a regular basis. After a crash I had to reboot the computer which always defaulted in camtasia to record without sound which then wasted even more time. The video files generated by camtasia are huge and the format is proprietary. One needs a special codec for other editing programs which is free to use but a pain to install. However, even with the codecs installed one needs to unpack the files to edit them with another editing program. Clearly camtasia wants to force one to use their video editor which is again a pain to use and lacks many professional features. Editing the two video files from the overhead camera and the screencapture was time consuming and the options of combining them were limited.

Finally it dawned to me that the capture area on the screen IS my video mixer!! The only software I need is some simple screen capture software. So, I would recommend the following:
Use any (free and/or open source) capture program which can capture a region of your screen and store the film as a standard MP4/H264 file.

My personal solution is pretty geeky but you get the gist: I record all my clips with ffmpeg (or now called avconv) which is a commandline video converter but also allows "converting" from a region on my screen directly into an MP4 file. It's available for Linux, Windows and Mac. My command line for Linux is:
avconv -f alsa -i pulse -f x11grab -show_region 1 -r 25 -s 1280x720 -i :0.0+1500,200 -threads 0 -b 10M -b:a 256k -ac 1 -strict experimental $1
...which has taken me quite a while to figure out and for that reason I put it into a script which I just start from the command window with all these cryptic commands in it.
You don't need to go down this route but the bottomline is: use any screen capture program which generates standard MP4 from a region of your screen and which marks the region with a box (see photo above) so that you know what you brodcast and what not. Feel free to send me your favourite screen capture programs for Windows or Mac and I put them here on this blog.

Audio

Headset
I started with a standard soundcard and a PC20 headset by Sennseiser (example clip here):

..which is amazingly OK for its price. The microphone can be moved around so that you can adjust the sound-quality. For me the main problem was to hear myself only on one ear. I then switched to the Sennheiser PC310 which is an open stereo headset which also sounds slightly richer (example clip):

The microphone is very directional which is great because it suppresses more or less completely any sound from outside or from the nearby coffee kitchen. However, the main problem with this headset is that it still just uses a standard unbalanced 3.5mm microphone plug. At work the power is so polluted with interference from dodgy equipment that I constantly got clicks in the recording.
Finally I went for the BPHS1 from audio technica:
It has a dynamical microphone which sounds really good compared to the Sennheiser headsets and has a proper balanced XLR plug for the dynamic microphone. The only drawback is that the microphone is harder to place so that it won't record any breathing sounds (example clip here).


Soundcard
With normal soundcards the problem is that you won't be able to hear yourself through the headphone. However this is highly desirable because time is precious and you want to know instantly if the sound/content is OK or not. Take for example breathing. The microphone might catch the air puffs from your breathing and the recording might be unusable. A second issue is microphone positioning because all headsets mentioned here have a highly directional microphones. Moving the microphone just a bit up or down will impact on the quality of the sound.

For webcasts the TASCAM US-125M is just great. It allows capturing audio from different sources such as a microphone (XLR/jack) and feeds the mixed sound directly back to the headphone. The computer sees just a new recording device at the USB port and the box won't need any drivers. It also has a limiter and manual gain control for the microphone. It has two LEDs which indicate the existence of an input signal and clipping. With this setup it's nearly impossible to screw up the recording.

Editing

I tend to edit the audio so that the talking flows without any mmms/erms and allow jump cuts in the video because there are no cutaways. For YouTube generally sound is normalised to 0dB which can be done with one click in virtually all editing programs.
For editing I use Sony Vegas because it allows batch processing so that it's possible to prepare many clips on the timeline and then Vegas renders them out as separate files, nicely numbered. See my previous post about batch processing and the script I'm using for this. The screen shot above shows the whole playlist (i.e. lecture) which means that all clips are in this single timeline. The region markers define the start/endpoints for every clip and then the batch render generates separate video files which all together then form a playlist. All this can run over night and then uploaded with one drag/drop to YouTube next morning. It saves enormous time.
Check out this comparison site for the different version of Sony Vegas. You need to have the pro version to be able to do batch render. Apart from the very convenient batch render virtually any video editor is suitable. At the end you need a program which is able to trim the start, end, can remove sections in the middle of a take, can normalise audio and video.

Tuesday, 22 October 2013

Sony Vegas Batch render

At the moment I'm creating a lecture series to be uploaded onto youTube which consists of hundreds of clips. To help comes here the batch render script by Sony Vegas which allows the rendering of regions into separate files from the timeline which is a great time saver. I just start the script in the "render regions" mode and then it generates all files while I'm away.

Unfortunately the original script shipped with Vegas creates filenames just containing the index numbers of the regions but not their names. I've modified the script so that the names of the regions are used as well as the index numbers:
http://www.berndporr.me.uk/blogspot/Batch Render2.cs

Sunday, 10 March 2013

AF101 setting for cinematic shooting

 Still from the horror short CUT FREE starring Vasso Georgiadou

Hi DOPs,

these are my favourite settings for noise free cinematic images (scene file) on my AF101:

Rec PH 1080/25P
VFR off
Detail -6
VDetail -6
Det. C -6
Chroma level -6
Chroma phase -2
Colour temp Ach 0
Colour temp Ach 0
Master ped -2
A iris 0
DRS off
Gamma Cinelike V
Matrix Norm1
Skintone DTL off

Most important are to set all details to -6 to avoid noise, master ped to -2 (0 give a black level higher than needed), gamma to Cine V and the matrix to Norm1. Chroma phase removes a slight pink-ish tint but that's a matter of taste.

Sunday, 4 November 2012

Tracking with laser specles

Imagine you film with shallow depth of field but still want to track precisely the background, for example to put something blurry in it (perhaps something scary or just a light?). The problem is that tracking requires sharp corners which do not exist when shooting with shallow DOF.

The way I have tackled the problem is to shine a diffused laser light in the scene. This diffused laser light creates a certain pattern which is called "Speckles". The amazing feature of this pattern is that it is always in focus. People like me who wear glasses can see the difference instantly by taking off their glasses and then the only sharp aspect left will be the speckle pattern. The bottomline is: if you light your background with laser light then you will have a fine structure which can be tracked!

I did two experiments with Adobe Aftereffects where I tracked a blurry background lit by tungsten...


 and one background lit by a green laser speckle:


The laser is just a standard green laser pointer which I put in a vice, added a diffuser and an ND gel to adjust the exposure. Here are the results (I blurred the text a bit to have the impression of a neon sign in the background, well, sort of!):

Tracking with laser speckle

Tracking of a blurry edge lit with a tungsten source

It can clearly be seen that tracking of the edge is much more precise using the speckle pattern. I made it for the laser tracking even more difficult by having a search window which has no chance to track the y direction precisely (see aperture problem). The camera was an AF100 at its highest bitrate and the lens was a Canon 50mm f/1.4 focused on the tool in the foreground. I had to add an ND filter to make the speckle pattern as faint as possible because H264 (as MPEG2) preserves more detail in the lesser exposed areas. The AF100 has a pretty nasty H264 compression which removes quite a lot of the speckle pattern but it still provides enough structure within the green area to improve the tracking.

Conclusion: lighting the background of a scene which is out of focus with a diffused laser makes tracking much more precise.

Sunday, 26 August 2012

my PC config for Sony Vegas


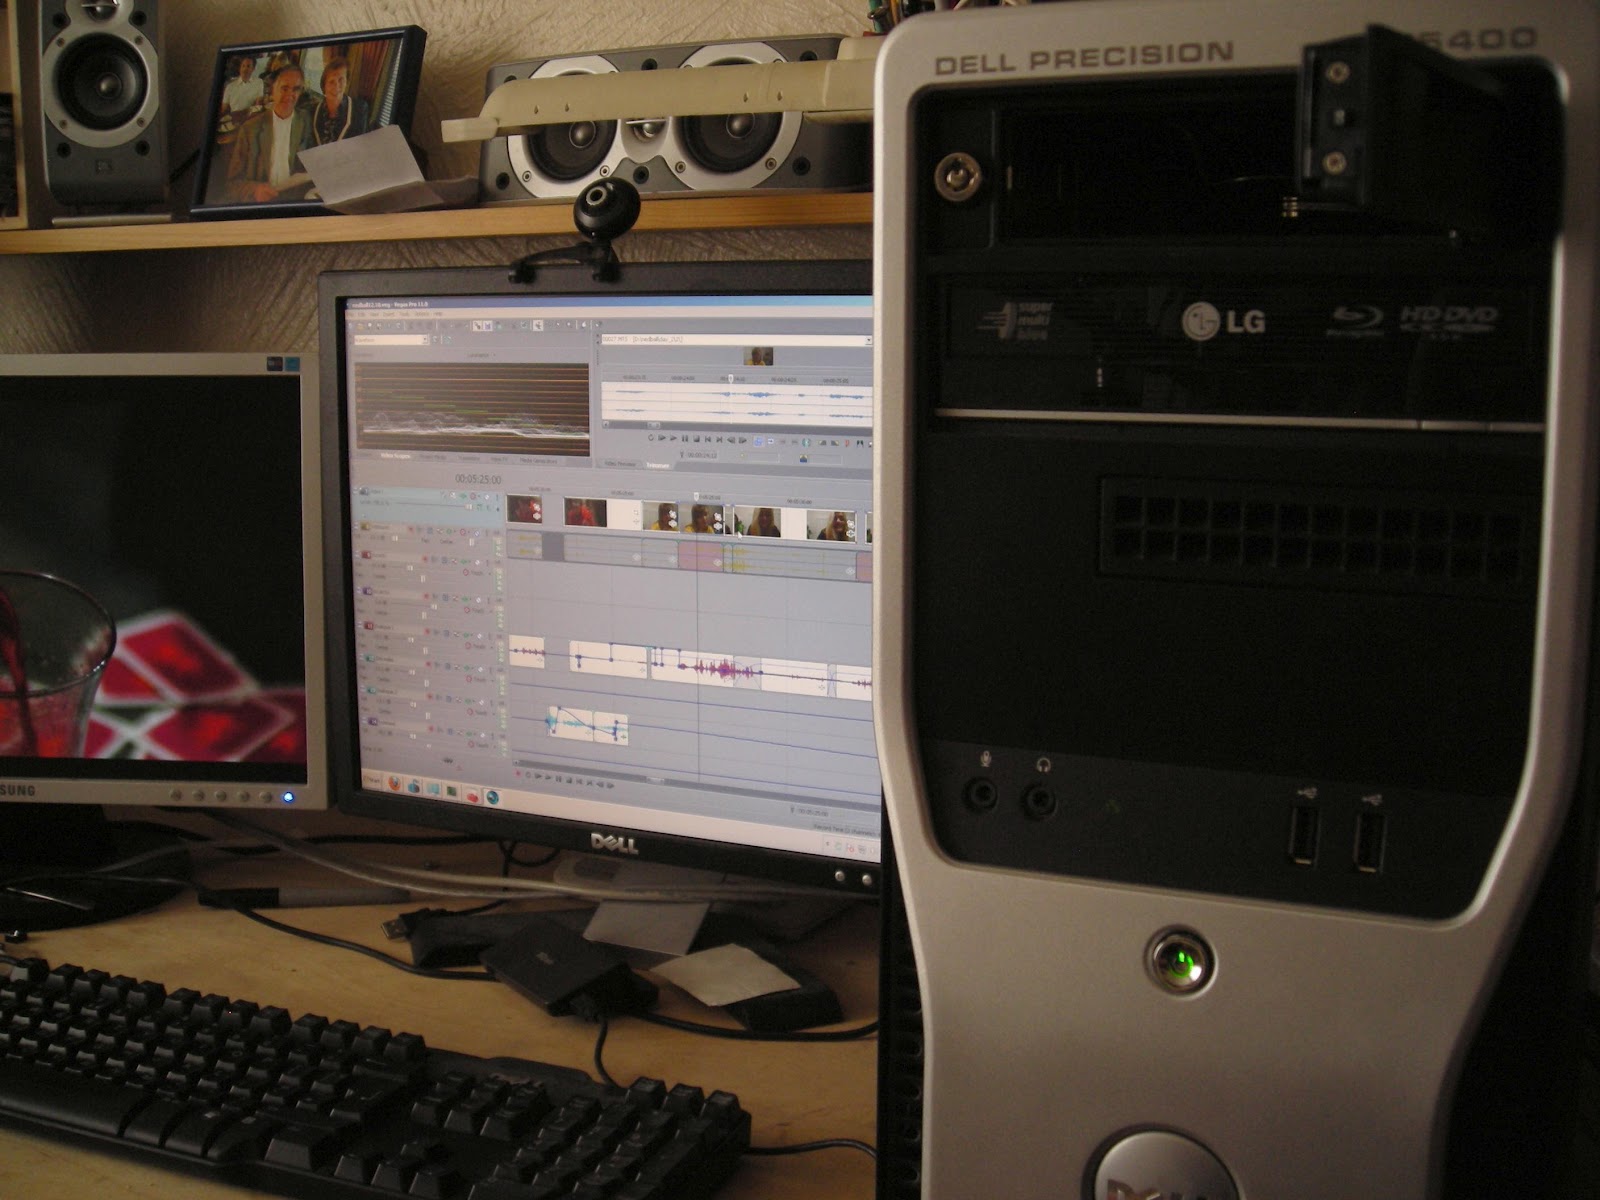
Here is the config of my PC which I use with Sony Vegas Pro V11 (overall you might spend about £500-700). I don't like spending loads of money on new computers. All components are bought second hand on ebay. The processing power of this setup is comparable to a gaming PC but at a fraction of the cost (and minus the water pipes running through your tropic aquarium).

  • Dell Precision Workstation T5400: It's a bit dated but still a very powerful computer and therefore really cheap on ebay. It has sockets for two (!) X5450 Xeon processors running at 3GHz (very much the same as a Mac Pro but at 1/4 of the price). Each processor has 4 cores. I've got only one processor fitted which is more than enough for editing full HD. Don't be fooled by the newer i7 processors with hyperthreading faking 8 cores which are actually only 4. If you want to halve your rendering time you can buy a T5400 fitted with two processors giving you 8 independent cores which all can be used by Vegas for rendering and timeline playback. Don't try to fit a second processor by yourself. I've tried but didn't know that the X5450 come in different serial numbers (called stepping numbers) and they need to have matching stepping numbers for Windows 7 to run (Linux won't mind). You will never be able to find a matching processor second hand. Better to buy a T5400 with two processors fitted and avoid the hassle.
  • The operating system is Windows 7 professional 64 bit. For editing it needs to be 64 bits because future versions of most editing programs will only be available in 64 bits.
  • RAM is 4GB and is more than enough for Vegas. The T5400 uses professional RAM modules with parity which gives you peace of mind that your data on your hard drives won't disintegrate over time. I'm also using Adobe Aftereffects which really would love to have 8GB. I might buy that soon. Again, easy to buy from e-bay and easy to fit.
  • Graphics card: ATI Radeon HD5700 (for the PCI-e x16 slot). This card has a GPU which is well supported by Vegas and speeds up rendering and timeline playback drastically. It's great value for money. You can also add a second graphics card to the second card slot in the T5400 which adds a second GPU to the computer and further speeds up editing. NVidia cards are also supported but are generally more expensive. Sony has published some GPU benchmarks and a compatibility list on this web page. The standard nvidia graphics card in the T5400 is also excellent but won't have GPU acceleration.
  • Monitors: you need two monitors for proper editing. One monitor for the timeline and one for the preview which can be also calibrated or use colour profiles. I've downloaded a colour profile for my Samsung monitor which works great. Vegas allows full screen preview on a second monitor which should be ideally something like 1920x1080 in resolution but any widescreen monitor will do with a reasonable resolution. Vegas will scale it down. I've got a Samsung 1440x900 and an ancient Dell 4:3 monitor for the timeline.
  • Hard drives: I've got numerous hard drives in my computer but mainly because I'm also running Linux. It's essential to have two HDs: one for windows (100GB will do) and one for editing (1.5TB). I have also an HD tray which I bought off ebay which allows plugging in bare SATA drives into the computer. This is invaluable for backups or for editing whole projects on a swappable drive.
  • Blu ray writer:  LG's GGW-H20L universal CD/DVD/Blu Ray writer. It's a cracking device and never let me down. Look out for the newer models. I've been burning Blu Rays from all different manufactureres and never had any problems. Important: Windows has trouble with the blu ray writer using the new SATA controller architecture. If you get stuck at boot time and there needs to be a DVD in your drive to boot the computer go into the BIOS and switch the SATA to legacy. It won't slow down but you won't get a 5th SATA port.
  • IEEE1394/firewire: I'm using a standard Texas Instruments based firewire card. It's important to know that the T5400 has 3 PCI slots and that there are two types of PCI slots (3.3V and 5V) which look different. Before you order a card have a look inside of the T5400 and check which kind of slot is free. The same applies to the sound card. Best you just buy PCI cards which are universal PCI cards and you won't have trouble swapping.
  • Sound card: the internal sound card is fine for stereo mixes and is surprisingly good. Use a good PC sound system with a subwoofer. However Vegas allows also 5.1 mix! Because of this I've now added an ASUS Xonar DG card. The driver installation is a pain (install-de-install-install) but once it's working you can connect the 6 analogue outputs to your favourite surround system (I use a Kenwood KRF-V5050) and start mixing in 5.1 under Vegas (always hoping that film festivals actually know how to set up more than one speaker correctly...). Don't use the optical or coax outputs of the card because they are only stereo and not 5.1. They only support 5.1 if the source is AAC compressed which is obviously not the case when playing back from Vegas.
  • More hard drives: The Dell has space for up to three hard drives. They are very easy to fit. You can connect up to four drives to the motherboard (3 hard drives and the Blu Ray writer). If you want to connect more you need a second SATA controller. I can only recommend the Silicon Images Si 3114 SoftRaid5 Controller. I tried cheaper ones from ebay and none of them worked (especially don't touch VIA, ever!). The Silicon Images controller is immensely versatile and works for all different kinds of applications. It provides the connection to my hard drive bay and also to an external eSATA connector to be able to connect drives containing digital cinema packages (DCPs). Linux allows hot swap with this controller so that it's possible to emulate what a DCP server does in a cinema.

Monday, 30 July 2012

Creating a DCP with openDCP

Here I'm describing how to create a DCP master for digital cinema projection.
I'm using Vegas Pro as an editing program and Ubuntu Linux for the DCP creation.

Export from the editing program

Settings

  • 1998x1080: this is the size you want to have if your source material is 1920x1080. Note the black bars to the left/right in the preview window. Make sure that Vegas is not scaling the image up to fit the screen. This would results in a very uneven vertical spacing of the lines. Some would be doubled and some not.
  • 24FPS in the settings. Some DCP servers can also play at 25P but rather not risk it. In our case the source material is 25P and Vegas takes care of the conversion to 24P.
  • Brigthness levels: the whole range of values need to be used from 0..255. In other words black is at 0 and white at 255. The standard however is 16 for black and 234 for white. Luckily the "pro"-res was already in the wrong format clearly visible in the oscilloscope. For native projects one needs to apply a level conversion which is often called from studio RGB to computer RGB. Check with your software.
  • Sound: it's 48kHz sampling rate and 24 bits. This means that every frame gets 2000 samples of audio. Simple as that.
  • Average sound levels at -20bB. In the example I had to reduce everything by -15dB (was adjusted to -3dB!).
  • 3 secs black before / after. The projectionist can easily add more black before / after.

Export

You need to export the picture as individual TIFF images and the sound as WAV.

  • TIFF: luckily there is nothing to configure here. Just export the film as an image sequence and select TIFF. Vegas compresses the images with LZW so that at least there's a bit of relief in terms of space. Check with a program such as GIMP if the images have the correct black levels namely that black is really 0 and white 255. Add an underscore to the filename such as "a_mugs_game_.tiff" so that the image number is nicely separated from the filename.
  • WAV: The sound files are exported as WAV files. Here, you need to create your own template probably. Cruical is that you export the audio streams separately: 48kHz, 24bits and mono (multiple) which creates you files called "a_mugs_game_left.wav" and "a_mugs_game_right.wav". In case you have 5.1 surround you also get the other streams separately. Again, it's good to have an "_" after the name so that the "right/left" are nicely separated.

Creating a DCP compatible drive

Hardware

The DCP is shipped on a 500GB hard drive which is inside of a CRU DataPort DX115 or DX115DC. The right part shows the actual DX115 carrier which contains the hard drive. I used a pretty standard 500GB hard drive. As long as it's SATA it should be fine. The docking station is an adapter which allows a SATA connection and a USB connection. Beware: not an eSATA connection which is very annoying. For proper testing the SATA connection is required. Connect a SATA cable to one of the free SATA slots inside of you your computer and run it to the docking station.
Alternatively buy an internal docking station which fits into a standard DVD drive slot. This is actually the "proper" method because this internal docking station is used in the DCP servers and allows hot swapping. It is very elegant in that you can plug in the drive while the server is running and Linux can mount it automatically. Removal of the drive can also happen during operation.

Linux

Time to reboot to Ubuntu Linux. In my case Ubuntu 12.04 LTS (Precise Pangolin). This version is highly recommended. It contains all necessary libraries and connects without any problems with the drive and because it's LTS it will be supported for at least 2 years.

Formatting the drive

The drive needs to be formatted as EXT3. This is probably the most risky step because you need to format the external drive and not your operating system (!). Type dmesg and have a look which drive is associated with your external drive:
[  139.684652] sd 7:0:0:0: [sdd] 976773168 512-byte logical blocks: (500 GB/465 GiB)
[  139.684689] sd 7:0:0:0: Attached scsi generic sg4 type 0
[  139.684712] sd 7:0:0:0: [sdd] Write Protect is off
[  139.684716] sd 7:0:0:0: [sdd] Mode Sense: 00 3a 00 00
[  139.684746] sd 7:0:0:0: [sdd] Write cache: disabled, read cache: enabled, doesn't support DPO or FUA
[  139.705147]  sdd: sdd1
[  139.705360] sd 7:0:0:0: [sdd] Attached SCSI disk
[  273.000188]  sdd: sdd1
[  429.766469]  sdd: sdd1
In this case plugging in the external drive gives you the device /dev/sdd. To be safe you should use fdisk with "fdisk /dev/sdd" and delete all particions and then create one primary Linux partition. It's menu guided so not very difficult.
Then you need to format this partition with:
sudo mkfs.ext2 -I 128 -j /dev/sdd1
This creates an EXT3 file system with an inode size of 128 bytes. Some people had difficulties with inode size of 256 on older servers but that was in 2008. Modern servers should all support the now default inode size of 256 but to be safe just force the formatter to use an inode size of 128. The option "-j" creates an EXT3 filesystem. However, also an EXT2 should do because it's downward compatible. Again, better to create an EXT3 even if that's not required by the DCP standard and a journal pretty useless in a read only filesystem.
Mount the newly created drive with:
sudo mount /dev/sdd1 /mnt
and then change permissions that you can write to it as a normal user:
sudo chmod a+rwx /mnt

Using openDCP

What I'm describing here has been done under Ubuntu precise pangolin with openDCP v0.0.26. Download the debian package opendcp-0.0.26-linux.i386.deb and install it with "sudo dpkg -i opendcp-0.0.26-linux.i386.deb". Then you are ready to go. If dpkg moans about missing packages just start your favourite package manager and install the missing packages and re-run dpkg.

Creating the JPEG2000 files

The TIFFs now need to be converted to JPEG2000 files and into the XYZ colour space. The can be done by the command line tools or by the openDCP gui. I used the GUI for it which shown here.
I just left the settings as they are. Important here is that the framerate is 24P and that the source colour space is sRGB and that there is a conversion to the XYZ colour space.
BTW, don't panic: the preview stays black. Also, there seems to be a problem with the progress bar. Check at the end that all images have been converted. If there are any problems then use the command line tool instead but in my case everything went fine. GIMP won't loads the JPEG2000 files but interestingly "eog" (eye of gnome) does. The images will look hazy and with wrong contrast. This is normal. If you want to check the images with GIMP you need to convert them to PNG with "convert".

Creating the MXF files

The actual files which are played on the DCP server are MXF files. There is one for audio and one for video. Again, I used the graphical tools to create the MXF files.

Picture

The MXF containing the picture is created again with the "opendcp" GUI. Select "MXF" and then JPEG2000, SMPTE and 24 frames per second. Specify the directory where all the JPEG2000 files reside and the output directory which should be on the EXT3 formatted external drive.
Both, the scanning of the directory and also the conversion will take a while so be patient. Alternatively you could use the command line tool:
opendcp_mxf -i . -o /mnt/a_mugs_game_video.mxf
assuming that the input images are in the current directory and the output MXF goes straight onto the external drive.

Sound

The sound is done in the same way but by selecting WAV in the uppermost drop down box. Then select if you have just stereo or 5.1 surround sound (6 channels). Barney, the projectionist at the GFT told me that he would prefer 5.1 because there is usually no time to switch to pro logic but in our case here we have just stereo.
The output MXF should be on the EXT3 formatted drive.
Just select all the separate wav files and then press Create MXF. This will probably just take a few minutes. As a curiosity there is no documentation how to create the sound MXF from the command line. You need to use the GUI.

Creating the XML files

The final step is to create the XML files which are the "glue" between the MXF files and contain the title and descriptions such as issuer and rating.
For the final step I switched to the command line tool because in the GUI version it's not clear what's happening to the actual files. The command line version won't move/delete any of the MXF files but just creates the XML files in the same directory. Run it in the directory of the external drive. In my case just called "/mnt" after "cd /mnt" (one line):

opendcp_xml --reel ./a_mugs_game_video.mxf ./a_mugs_game_sound.mxf --title A_Mugs_Game --annotation OpenDCP_CPL --issuer BratwurstAndHaggis --kind feature

Don't forget to properly un-mount the drive before unplugging or just shut down the computer. 

To test your DCP plug the HD back in. If you have USB connection then you should instantly see the files. If you have the internal SATA bay then it should show up in your dmesg when the drive is inserted into the computer. Mount it as described above and check that everything is there.

To test if it plays you can use the dcpPlayer for example. It plays the first 15 secs of your film or you could invest about £150 for a license. This is only available under Windows and you need to install a driver which can mount the EXT3 filesystem.

Finished!

Credits:
Matt Cameron's DCP tutorial
A big thanks to the GFT for letting me to try out the DCP and especially Barney who gave me valuable feedback especially about the sound.

Tuesday, 3 July 2012

GH2 hacks

At the start of the year I was really excited that the GH2 got finally a firmware update which allows HD recording at 25P and high bitrates. I used this mode for my film NEDball. However some shots had horrible blocking artefacts:
Notice the area around the cheek (click on the image to enlarge). The bitrate of this shot is pretty low throughout:
It rarely goes above 12Mbit/sec.
I did a couple of test shoots and found the problem: the camera drops the bitrate if the foreground is dark. Remember what every consumer has been brainwashed into? Have the light behind you. Put the flash on the camera. Have the sun behind you. In more professional terms: keep the key behind the camera. Well, we all know how that looks: crap! Cinematic lighting is often with the key at very steep angles or from behind the subject. It looks best if the sun is behind the subject and we bounce light back into his/her face.
In the example above it's an HMI clamped on the door suggesting a practical light clamped there (and therefore deliberately not hiding the cable). INT daytime lighting is usually against a window so that the subject's face is often pretty dark.
There are numerous patches available for the GH2 from the site Personal View. It's an excellent site and I encourage to donate to the project. After having tried out most of the patches I can only recommend the so called "Sanity pach" from their page or it can be downloaded also here. This patch produces nearly constant bitrate no matter if the foreground is dark or not. Any other patches (flowmotion, aq4, vanilla, intra x, ...) perform well shooting grass, bushes and other detailed patterns but drop the bitrate drastically in underexposed areas and look exactly as the original HBR mode -- and I rarely shoot bushes in my films.
Some of the patches waste over 100Mbit/sec and still look terribly blocky. It feels a bit like these audio-philes who claim that only a cable with a diameter of 10cm (used to power a whole village) sounds perfect connecting the amp and the loudspeaker forgetting that the mechanics of the speaker introduces >1% distortion. Anyway. Coming back to the cinematic lighting:
Here we have a still from "Mirrorgod" (with Jamie Lee McPherson). It has a similar brightness profile as the shot above
but this time we have no compression artefacts at all (again click on the image to enlarge). This has been shot with the Sanity patch. It only drops the bitrate when it's completely pitch black but otherwise it always stays at about 30Mbit/secs.
Conclusion. Don't get fooled by people claiming that "inter" and/or 100Mbit/sec are absolutely necessary to produce great footage. It's rather crucial that we won't let the camera decide what's important but that we leave that to the viewer. I highly recommend the Sanity patch for that reason. It has sane bitrates, is ultra-reliable with class 10 SD cards and has outstanding quality.